January 30, 2019 · by Synoptek Team 6 min read
Point of Sale or POS systems are commonly used by retailers to complete a transaction that takes place with a customer when a product or service is purchased. Usually, a combination of on-premises hardware and software used for processing a transaction and payment, today many retail businesses are moving to cloud-based POS systems and use them to process sales, operate the cash drawer, scan bar codes, print customer receipts, calculate tax, and more.
Dynamics 365 for Retail’s integrated POS system is a much sought-after solution with features that help businesses centralize their retail sales processes and drive higher retail efficiency. Read on to understand the basic differences between on-premises and cloud-based POS systems. In addition, learn about the best practices for configuring the POS system in Dynamics 365 for Retail to fit your business best.
Not sure if you are ready to take the next steps towards Microsoft Dynamics 365? Here are 5 reasons that you should consider before moving forward.
On-premises vs. Cloud-based POS Systems
Prior to purchasing a POS system, evaluating the difference between traditional on-premises and cloud-based POS systems is of critical importance. To do this, you must first familiarize yourself with the two systems. This comparison of on-premises and cloud-based POS systems is meant to walk you through the unique aspects, benefits, and drawbacks of each;
- On-premises POS systems ideally operate within the internal network of an organization, and use local servers in storing information. POS tools are purchased up front, with data accessible only from the local server or through an alternate web app.
- Cloud-based POS systems, on the other hand, leverage cloud technology to provide users with the ability to access the platform from anywhere and at any time. They work well with most POS hardware, and offer a level of comfort that is unparalleled.
Comparison
| POS Type | Advantages | Disadvantages |
| On-premises |
|
|
| Cloud-based |
|
|
Best Practices for Configuring Dynamics 365’s Retail POS System
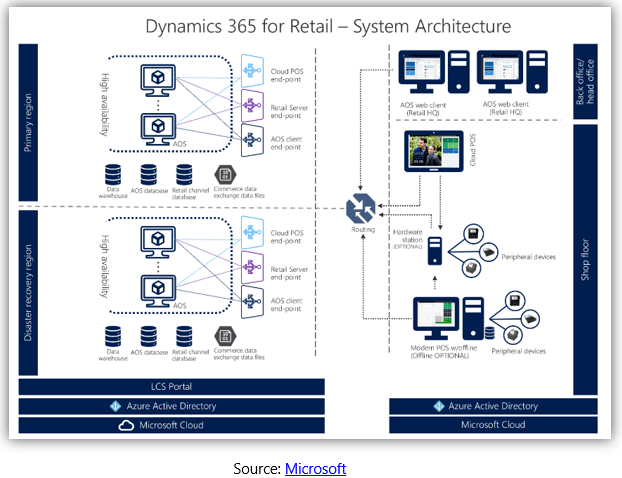
Microsoft Dynamics 365 for Retail has an integrated POS system that allows organizations to unify their digital, in-store, and back office operations and create exceptional, insightful shopping experiences. It offers two types of POS experiences: a browser-based cloud POS (cPOS) that can be used on mobile devices, and a retail modern POS (mPOS) that can be used on PCs, tablets, and phones to process sales transactions, customer orders, and daily operations, as well as to perform inventory management.
Before you begin configuring your Dynamics 365 for Retail POS system and setting up your registers and devices, you need to set up a few pre-requisites:
Once these pre-requisites are in place, you can move forward with configuring your Dynamics 365 for Retail POS system. While there are several POS deployment options such as cloud only, cloud only with hardware station, cloud with hardware station and offline capabilities, retail scale unit with offline capabilities, and local hardware station, here are some best practices for deploying a cloud-only POS system using Dynamics 365 for Retail:

1. Define Payment Methods
Dynamics 365 for Retail helps you set up the payment methods that will be supported by your retail businesses. Since customers are likely to shop from any retail channel including brick and mortar, e-commerce and call centers, your POS system should be configured such that it supports all channel types. Using the drop-down selection, indicate the function that will be performed by that payment method. This is key as it will support functions performed by your POS button functions.
2. Define Card Types
There are various types of cards customers might use at a POS system including credit, debit, loyalty, or gift cards. To ensure seamless payment through cards in your retail business, you must first determine the types of cards you plan to accept, and set those up in a legal entity in Dynamics 365 for Retail. Enter the required details in fields such as Card ID, Card type name, and Card issuer. Once you have added all the details, just click Save.
3. Setup Registers
In any retail setting, registers are important components as they are used to define aspects related to a specific store. The key fields to define your register include hardware profile (physical configuration of a terminal) and visual profile (screen characteristics), store number, and sales menu. Dynamics 365 allows you to set up profiles specific to a single terminal or a group of terminals. Before you set up a register, you need to set up terminal(s), and assign profiles to them.
4. Setup New Stores
For all your retail locations to get updates from back office, it is important to add your existing and new locations to the channel database list. Once you add a new location to the list, necessary database updates will take place which will include updates such as products, pricing and discounts, customer, tax, staff, and register information. To activate a new store, all you need to do is select the store from the drop-down list, enable full data sync, and select the distribution schedule you want to run. Once you do this, your new store will be activated.
5. Define Devices
As devices are the actual physical units that are associated to any POS register, it is important to specify the devices that will be used for accurate mapping. This can be a standard POS, android phone, or an iPad, to name a few. Depending on the type of application you want to use, validate the devices for activation, and follow the instructions to activate your device.
Once you set all this up, you can begin executing transactions for your retail entity. Click on the cloud-POS URL and simply follow the instructions. Make sure you have addressed everything stated in the “before you start” section for complete activation of your device. Once the activation is successful, you can bring up the POS application by clicking on the Get started button.
Streamline your Retail Operations
In today’s competitive retail environment, Dynamics 365 for Retail helps retailers get ahead with tools that steer their retail operations, deliver a connected employee experience, and delight customers with exceptional shopping experiences. With all the benefits that Dynamics 365 for Retail offers, correctly setting up the POS system is critical to drive a positive business impact. Follow the laid down best practices, and ensure your POS system is correctly activated to bring about the desired outcome.
